The Tuesday Afternoon Quilters make quilts–actually, technically comforters since they are tied off, rather than quilted–consisting of 5″ blocks, eight across and eleven down, and then arranged in diagonal rows of blocks utilizing the same or similar fabrics. These are the ultimate scrappy quilts, consisting of the leftovers of all the clothes that Rakefet has ever sewn plus the offerings of all the people who decided that TAQ was the no kill shelter for projects they would never finish. They will never run out of fabric. Usually the process starts with KK pulling some likely looking pieces from the scrap bin (at one point Abby told Rakefet to throw out that raggedy cardboard box for heaven’s sake, and go to Target to buy a plastic bin, so now things are much tidier) Then somebody irons them and other people start cutting them frugally into component parts. If it’s a big scrap, they harvest a bunch of big squares, enough for one diagonal row which is a maximum of eight blocks. Afterwards, or if it’s smaller to start with, they cut the smaller squares and triangles that can be seamed into a 5″ block. These smaller pieces are stacked according to size and shape, and somebody constructs composite squares, two big triangles, four little squares, or some other combination, carefully putting all the pieces between the pages of an L.L. Bean catalogue.
When there are enough “pre-blocks” in the L.L. Bean catalogue, Abby or Rakefet sews them together on the serger, which makes a nice 1/4″ seam, but of course they could be seamed on a regular machine as well. As soon as there are a lot of blocks, they roll up the rug and lay out the quilt, four diagonal rows of 8, then rows with decreasing numbers of blocks until they reach the bottom row. The upper left square and the lower right are prime positions for that weird block that doesn’t go with anything.
After that, Abby walks around in circles and says things like, “I don’t like those two patterns next to each other,” and “That cow is standing on her head,” and “Switch the red row and the blue row,” until everybody agrees that it’s beautiful–and it always is. Then it’s pinned into rows and each row has a number, from 1 to 11, pinned to the last piece, in case Marie and Claire tip over the pile, and someone serges the eight pieces into a row and the eleven rows into a quilt top.
The backing is spread on the floor, the fluff laid over it, and the quilt top over that, making sure that there is enough backing material protruding past the top to fold over and make a binding. They pin each square through all three layers with a big safety pin, slightly off center, starting from the center of the quilt and working out to the edges. Then the incipient quilt is laid on the big table and each square tied off with some fetching shade of perle cotton threaded through a big long needle with a big eye, and tied with a double or triple knot, leaving about an inch of floss above the knot. At last the fluff is trimmed even with the quilt top, and the backing is trimmed to an inch or an inch and a half all around, folded and pinned, and Rakefet sews it in place on the regular machine, cursing and spitting as she gets poked with all the pins. The quilts are distributed through Catholic Charities, who make sure to find them a good home.
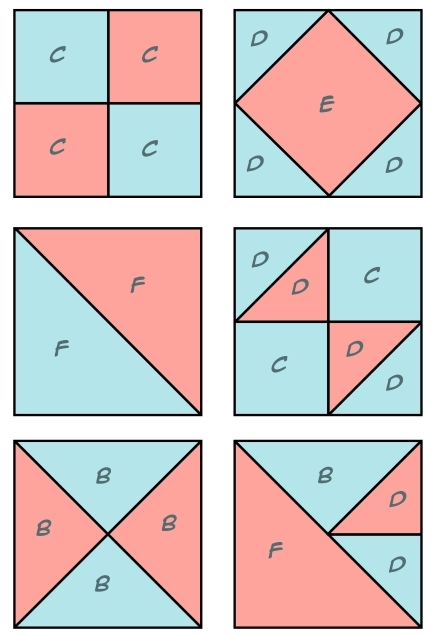
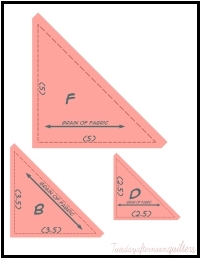
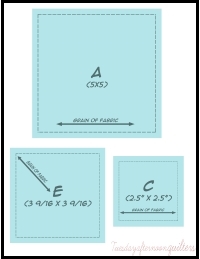
Before a 5″ block is joined to its neighbors, it is actually a 5 1/2″ square, allowing for 1/4″ seam allowance. A block can be a single square, two triangles, four smaller triangles, four small squares, or a square surrounded by small triangles or several other combinations shown below. It is easy enough to make your own template directly onto a piece of cardboard with a ruler and a right angle, but the important thing is to first draw the finished piece and then add on the 1/4″ seam allowance.
If you would rather have a paper pattern, instructions for downloading true size patterns are found below:
Step 1: Download the files containing the needed pieces, print them and cut them out.
Note: In order to be sure the pieces will be the correct size, first save the downloaded files to your computer, then open them with your PDF reader program (Adobe Reader, etc.) and print them out. Printing directly from the browser may cause them to be too small.
You may right-click the icons and choose the save link as option to save the file in a convenient location, like your Desktop. Or you may left-click the icon, and when the file opens in your browser, select the download, save, or save as options to save the file to your computer. But do not print from the browser’s display!
Once you have saved the files on your computer, you can use your PDF reader to open and print them.
Step 2: Assemble your squares according to one of the following patterns: